
Walnut Hollow is excited about our Blog Hop with Ice Resin! Today and tomorrow we will be sharing projects using Walnut Hollow Wood and Tools with Ice Resin’s Kits, Bezels and jewelry making accessories.
Friday:
Walnut Hollow- Sara Shirman (This post)
Ice Resin- Tatiana Allen
Saturday we will have projects from Chris Wallace of Walnut Hollow and Candy Rosenberg of Ice Resin. Stay tuned for links!
Be sure to enter for a chance to win this great prize package!

The package includes one Creative Versa-Tool®, one 8″x10″ Wood Panel and one Keepsake Box! You can enter by any of the following actions:
1. Follow Walnut Hollow’s Blog.
2. Like Walnut Hollow on Facebook.
3. Follow Walnut Hollow on Twitter.
Please leave comments on our posts and let us know what you think! The winner will be selected on Wednesday, January 29.
Inside-Out Locket by Sara Shirman:

When I received my package from Ice Resin I was still not sure what I planned to make with their beautiful bezels. The Rue Romantic pieces from Ice Resin were all so elegant with intricate borders and romantic shapes. I had to think about it for a long time. It was not until I was going through some photos on my computer that I decided I wanted to make a locket. I found this picture of my parents on their wedding day in 1982. The photo is exquisite with a vintage feel which matched the detailed qualities in the Rue Romantic Bezels and Chains. I thought about turning the bezel into a locket but decided the image should not be hidden inside the pendant but worn to be seen. I determined that an “Inside-Out” Locket would be more appropriate.

Preparing the bezels: I started by printing out the photo and cutting it to the shape of the recess of the bezel. This was a bit tricky but I put the photo over the back of the bezel and carefully traced the oval over the photo with a pencil. I cut it out, fit it into the shape, then trimmed where necessary. It was a trial and error system. Then I picked out some other materials I would use to create the necklace.

I used the same tracing method to cut a heart out of a scrap of Secret Garden Graphic 45 paper. The rose fit perfectly in the heart and went with the romantic feel of the jewelry pieces. I printed out my parents wedding date on a piece of white paper and cute it out. Using Tombow’s Power Tabs, I adhered the date to the rose paper. I cut one tab in half to cover the back of the strip of paper.

Here is what the bezels looked like before adding the Ice Resin.

To prepare the Ice Resin I mixed equal parts of part A and part B into the little cup that it comes with. I used a wooden popsicle stick to stir up the chemicals for about 2 minutes. Here is a helpful video tutorial on how to mix the resin.

I carefully poured the Ice Resin over the paper inside of the bezel. Pour slowly so the bezel does not overflow. Once I was happy with the level of the Ice Resin in my charms, I let the pieces sit for a day.

When the Ice Resin was solidified I embellished the shell with hot fix crystals.

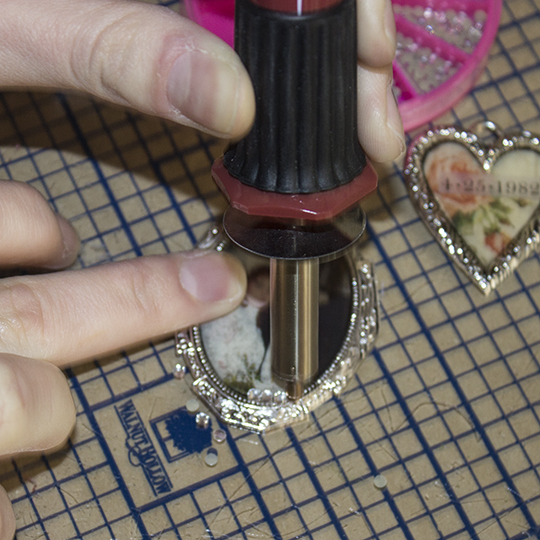
I set up the Walnut Hollow Creative Versa-Tool® with the flow point and turned the heat dial to the bright yellow setting (as shown below).


I picked up the crystals with tweezers and placed them around the border of the picture. I held the heated Creative Versa-Tool over the crystal until I could feel that the glue had melted. The crystal will slide around more freely when the glue has melted. I pushed them into place using the tweezers.


I used the same technique to apply one green crystal to the heart bezel.

Preparing the Chain: For the chain part of the necklace I used 2 Rue Romantique Pearl Chains, a smaller scrap of chain and some Simplicity Ribbon Trim. To embellish the chain I used a Prima Flower, some burlap and a needle and thread. I wove one of the Ice Resin Pearl Chains through the ribbon, hooking the end of the chain to the end of the lace to keep it in place. I pulled the chain in and out of the eyelets in the lace.

I then attached the 2 pearl chains.

Using a jump ring I added the larger chain to the loop where the 2 pearl chains joined.

I used a hot glue gun to adhere the Prima Flower to a scrap of burlap.

I threaded a needle to sew the flower and burlap to the chain.

I wove the needle through the burlap and the chain to keep them together.


Once the flower was in place on the necklace I attached my bezels using silver jump rings.


These lockets are gorgeous!!! I love everything about them!!!! Would love to win the awesome prize package!!! Thank you for the chance to!
I follow your blog, am a fan on Facebook and I also follow you on twitter!!!! Thanks for sharing your gorgeous project with me!!
Thank you for the support Barb!! We love to hear from you!
The necklaces are beautiful. A great way to have a memory of your parents with you at all times. thanks for the detailed instructions.
I follow thru e-mail and I have “liked” you for awhile.
Thank you so much!
I’m not on Facebook, but I follow walnuthollowcrafts on Twitter and will add this blog to my queue of blogs that I follow on Bloglovin’.
Thanks for the opportunity to win!
That locket necklace IS fabulous! I don’t normally like a lot of lace and frills, but this appeals to me.
Beautiful project! I love how the necklace was done around the neck area with the added lace.
I follow your blog and have also ‘liked’ you for some time. I love your tools and always enjoy learning new projects. Thanks for the opportunity to win an awesome prize package.
Woah nelly, how about them applse!
I love how you embellished the chain with lace and flowers, Sara. Congratulations of your 22 years of marriage.
Lovely piece. I liked the tool you used to set the rhinestones. It was new to me.
What a fabulous necklace and a perfect way to remember your parents’ wedding. The ice resin really sets it off beautifully.
Beautiful necklace! Love the pearl chain threaded through the lace – Great idea!
love this project, I would love to make this. thanks for the chance to win
The necklace is beautiful! It makes a wonderful keepsake. I already follow the blog, facebook & twitter. I had the Versa-Tool briefly. My sister really wanted one so I gave it to her.
Fun giveaway! I also
liked you FB page.
Thanks for the chance
to win.
Carla from Utah
I wasn’t sure about this project because of the name but I absolutely love the finished project. What a wonderful way to share a memory.
Those are great projects. I would love to do a beautiful wood burned design on the keepsake box.
Pingback: What Happens when ICE Resin and Walnut Hollow Combine? : Ice Queen E-Zine
Pingback: Life is too short… | walnuthollowcrafts
So lovely and ornate!
Thank you for the inspiration and the chance to win!
Pingback: Sunday Links to Tangles, Tutorials and Giveaways #zentangle #Giveaways #Lifeimitatesdoodles | lifeimitatesdoodles
This giveaway is awesome. The box would be beautiful with a nice pattern. The necklace turned out gorgeous. Beautiful and what a keepsake it will be. I enjoy crafting so much. Blessings.
OH MY GOSH Fabulous inside out lockets and tools to make the necklace!!!
half_blue_sky@yahoo.com
This would be so fun to win! I follow on FB- Jenna Osborne and twitter @Kissesforusall
What a sweet piece… I love the idea of an inside-out locket! I follow the Walnut Hollow blog, like on FB, and follow on Twitter! Thank you for the chance to win!
OMG! Gorgeous! I just must try and make one like this! I love the vintage and romantic tone of this piece. Just breath taking. Thanks for sharing!