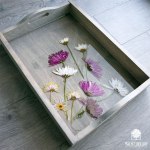
Seal Pressed Dried Flowers in a Protective Resin Finished Tray to keep them forever and bring a touch of spring to your decor too. Continue reading

Seal Pressed Dried Flowers in a Protective Resin Finished Tray to keep them forever and bring a touch of spring to your decor too. Continue reading

There is really no place like home. You can easily wood burn a picture of your home onto this fun wood burned Home Sweet Home key hanger to display in your home. Or, use a place that’s special to you … Continue reading

One of my favorite additions to the Walnut Hollow collection is the Bark Edge Letter Board. The new letter board comes with a set of letters that fit in the pre-routed lines perfectly so you can create fun messages on … Continue reading

Spring is one of my favorite times of the year. I love the new growth when everything is waking up again after winter. Growing things makes me happy, and if you’re the same way, I think you’ll enjoy this fun … Continue reading

I love to combine beautiful wood textures with other media! Wood and leather go particularly well together I think. Varying thin leather straps woven through the slats of a Walnut Hollow Mini Crate creates a fun texture combination. You can … Continue reading

A stovetop cover board is perfect for those times when you just need a little bit more counter space and you aren’t using your stove burners. These Walnut Hollow Rustic Pallets are the perfect size for a standard glass top … Continue reading

The ability to display your personal photos and pieces of art on the walls is one of those things that can make a house feel like a home. The new Walnut Hollow Art Display with Rails is perfect for personalizing … Continue reading
Creating a serving board inspired by the Ocean Waves is easier than you might think. The gorgeous new Walnut Hollow Serving Boards are a beautiful canvas for these amazing ocean waves. With just a small amount of resin (you only need 2 ounces), some craft paint, and a heat gun you can create a magical ocean scene of your own to wow your guests.


Always wear gloves and protect your work surface when working with Resin Epoxy.
Measure and pour the two-part epoxy. You only need 2 ounces of epoxy for this project. It’s very important to follow the brand-specific instructions on the packaging as each brand is just slightly different. The epoxy I am using requires equal parts of the resin and the hardener. Stir the parts to combine for the specified length of time on the packaging.

Pour the epoxy into a second container and stir again if required by the type of resin you are using.
Separate your resin out into smaller amounts. I used three shades of Blue and a White. Keep a small amount of clear epoxy without any tinting.

Set the clear epoxy aside. Add a drop of paint or two to each smaller cup of epoxy. Mix thoroughly.

Place several empty cups on your covered work surface, and set the serving board on top of the cups. This allows the excess epoxy to drip off of the sides rather than pooling around your serving board.

Starting at one edge of the serving board, pour each of the blue colors in straight lines. Start with the darkest blue shade on the outside edge. Adding a thin stripe of untinted epoxy between each color stripe helps with blending.

Pour small lines of white along with your colored stripes. Vary and break the lines throughout.

Using your heat gun (or hairdryer) gently blow the epoxy to move it. The warm air will make the epoxy move a little bit better. Use the air to push some of the darker blues into the lighter blues, and to disperse your white. The white, when it blends, will look like the tips of waves. Don’t overdo this step or all of your colors will just blend together into one blue blob. That will look beautiful too, but it won’t look like the Ocean.

Allow the excess epoxy to run off and drip for approximately 30 minutes. Use the side of a craft stick to scrape underneath the edge of your serving board to remove any drips that have formed and not dropped off.
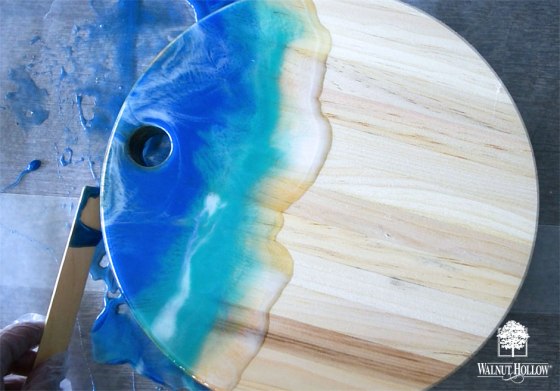
Allow your Ocean Waves Serving Board to cure for at least 24 hours. Once the resin has hardened and cured, you can use or display your beautiful new serving board. Adding a coat of food-safe mineral oil to your serving board brings out the gorgeous wood grain even more, which compliments your lovely ocean waves so beautifully.

Resin makes these Beautiful Walnut Hollow serving boards even more beautiful, don’t you think? Which serving board shape is your favorite?

Wood burned art is so beautiful. Often a wood burned piece of art needs no other additions to be gorgeous. But sometimes you may find that you want to add some color to your wood burned design. A little pop … Continue reading

I have focused a lot this year on downsizing in many areas of my life. One of my favorite ways to downsize and declutter is to keep things that are multi-functional. That includes seasonal decorations. I love that these beautiful … Continue reading
