


As a jewelry maker and mixed-media artist, I’m always looking for fresh and fun ways to display my wearable art. Did you know that so many of the fantastic wood products made by Walnut Hollow provide the perfect base for beautiful and useful forms to hold and store your jewelry?
For my project today as part of National Craft Month, I wanted to create a fun and functional wall display. It’s easy to upcycle old wooden thread spools into knobs when you use a Basswood Country Round as the substrate. The best part about this project is that you probably already have the supplies in your craft room to make this today.
Supplies
- Basswood Country Round in medium
- Old Wooden Spools
- Acrylic Paint
- Stencil (I used a mum stencil by Stencil 1)
- Paintbrushes
- Nails
- Steel wire (the one I used is called tie wire and you can buy it at you local hardware store)
- Spray Paint
- Strong Glue (I used E6000)
- Wall hanger

Directions
Add a hanger to the back of the basswood round so you can later hang your project on a wall. Next, place stencil onto the wood and start to paint. If you are using a paintbrush rather than a sponge when stenciling, be sure to have a paper towel handy to wipe off some paint before adding to to the wood. This will help you control the paint so it’s not too “gloppy” and doesn’t seep under the stencil. After you’ve painted the stencil pattern, go ahead and paint all the wooden spools the color of your choosing. I used a blue/greeen/cream color palette for this project.

Use wire snips to cut a 8 inch piece of steel wire from the roll.
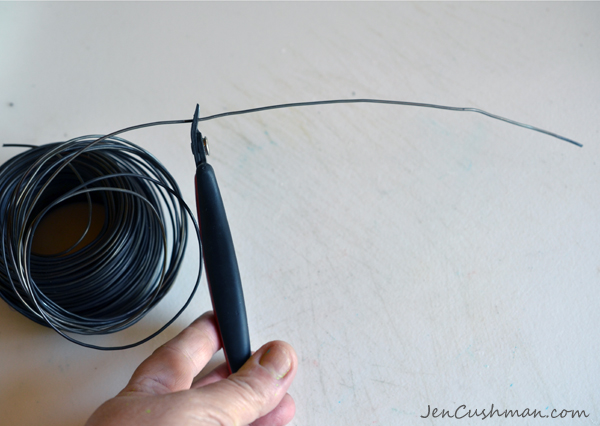
Use your flat nose or chain nose pliers to make a 90 degree bend in both sides of the wire.

Spray paint the wire with a color if you wish

Decide where you want to place the spools for your jewelry display. Hammer nails into the wood. You will need the nails for this project to add strength and structure to the holder. If you glued the spools without adding the nails, the weight of the jewelry could easily cause the spools to break right off.

Hammer three more nails in the spots where you wish to place your necklace holders.

Use a strong glue such as E6000 on the bottom of the wooden spools, place over the nails and glue to the wooden base. Add glue to the ends of the wire and place them into the spools, creating the earring holder.

Hang your favorite jewelry for a cute display.

What colors or designs will you choose for your display?


Did you know I recently filmed a DVD using another fabulous Walnut Hollow product? Check out my blog today to see how I used the large French Provincial Signboard for my vintage-Parisian chalkboard.

–Jen Cushman
Bio: Jen Cushman is a mixed-media artist, instructor, columnist and author of two books; “Making Metal Jewelry; How to Stamp, Form, Forge and Fold Metal Jewelry Designs” and “Explore, Create, Resinate; Mixed-Media Techniques Using ICE Resin”. Her art has been published in numerous national magazines. She writes a column called The Mixed Media Metalsmith for Cloth, Paper, Scissors magazine and also a business advice column for Artists and Makers magazine.


Pingback: My new DVDs are here! |
Amazing jewellery!! I read your article i like your writing with your ideas. Thank you share this post.
Pingback: Simple and Colorful Jewelry Holder |
Pingback: Rustic Bark Edge Shadow Box Earring Organizer | walnuthollowcrafts
Pingback: Fun Jewelry Holder | 1000 – Modern