
With Autumn arriving next month, I’ve been prepping for Dia de los Muertos and Halloween. Sugar Skulls are iconic in celebrations, as are sweet treats and offerings. This wood burned and painted wood treat box can hold sweets, altar offerings, or become a mini shrine. I’ve created skull art for many years, deeply influenced by Day of the Dead iconography and symbolism. I normally use marigolds with sugar skulls, but I feel my woodburned flowers looked more like roses. Dia de los Muertos is a two day celebration to honor departed loved ones and ancestors. Marigold are commonly used in funerary rituals and are widely used in the holiday, to draw the souls back to Earth.

SUPPLIES:
- Walnut Hollow Rounded Trunk Box
- Walnut Hollow Creative Versa-Tool
- Universal Point
- Pencil
- White, hot pink, red, bright green, kelly green, and turquoise acrylic paints
- Small detail paint brush
- Flat soft paint brush
- Mod Podge Ultra Matte Chalk Finish
- Paper plate
- Cup of water
- Paper towels
INSTRUCTIONS:
1)Squeeze white acrylic paint onto the plate. You’ll use the paper plate as a palette for every paint color.
2) With the flat paint brush, paint the box outside white. Let it fully dry.
3) Rinse the brush in the cup of water. Dry your brush with the paper towel. Repeat each time you change colors or products.
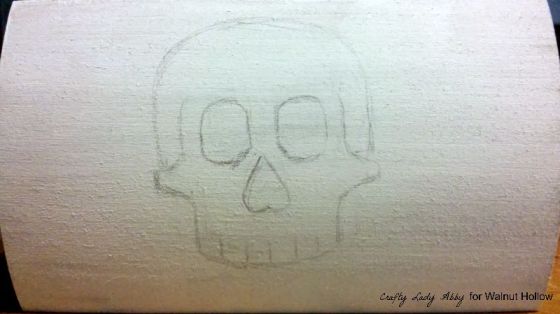
4) With the pencil, draw a skull on the center box top. Draw crossed bones on the box front. The drawings can be anatomical or stylized.

5) Screw the universal point onto the Creative Versa-Tool end. Turn the tool dial up to red. The hotter the better.
6) Follow the drawing with the Creative Versa-Tool to wood burn the design. Go slowly for a dark even burn.

7) On either side of the skull, wood burn flowers by waving the tip back and forth, staggering the petals. For the leaves, woodburn basic leave shapes and veins.

8) Turn off the Creative Versa-Tool. Let it fully cool down before storing it inside the case.
9) With the turquoise acrylic paint and detail paint brush, carefully outline the wood burned designs on the lid. Using the flat paint brush, paint the remainder of the non-wood burned top, turquoise.
10) With the bright green acrylic paint and detail paint brush, carefully outline the wood burned designs on the front and around the top edge of the sides. Using the flat paint brush, paint the remainder of the non-wood burned sides and bottom bright green.
11) With the red acrylic paint and detail paint brush, fill in the flowers. Don’t paint over the wood burned lines.
12) With the bright green acrylic paint and detail paint brush, fill in the leaves. Don’t paint over the wood burned lines.

13) With the hot pink acrylic paint and detail paint brush, follow the outer edge of each petal, to add definition.
14) With the green acrylic paint and detail paint brush, paint shadow lines along the leaf veins.

15) With the hot pink acrylic paint and end of a paint brush, make dots along the bones.

16) With the acrylic paint colors and detail paint brush, add sugar skull designs to the skull.

17) With the hot pink acrylic paint, detail and flat paint brushes, paint the inside of the box.
18) With the Mod Podge Ultra Matte Chalk, and flat paint brush, seal the outside of the box. Let dry completely. Seal the inside of the box. Keep it open until its fully dry.
19) Fill the box with treats. The Mod Podge isn’t food safe. Wrap any food in plastic, tissue paper, or wax paper.

I used bright colors, but this project would look great in dark, jewel tones, or Earth tones too. You can personalize the sugar skull any way you want. If this is for a particular person, paint their name across the top bone or below skull. If the flowers are too tricky, a basic wood burned pattern would look great too. The sugar skulls shown above are the real deal, but in miniature. They’re so lovely, I’ve yet to eat them! After all the treats are eaten, put keepsakes, photos, or jewelry inside. What ever you chose to do, have fun with it! Happy Makery!
Stock up on essentials to make projects like this and more during our 50% off sale at WalnutHollow.com. Click the banner above to shop now.
 Abby has been an artist and crafter since she was a young child. She has been sewing and creating for 30 years. She has a degree in Fashion Design. She started her blog, Crafty Lady Abby in 2009, as a way of documenting her creations and motivating herself. She creates tutorials to share her creative knowledge and empower others to be creative.
