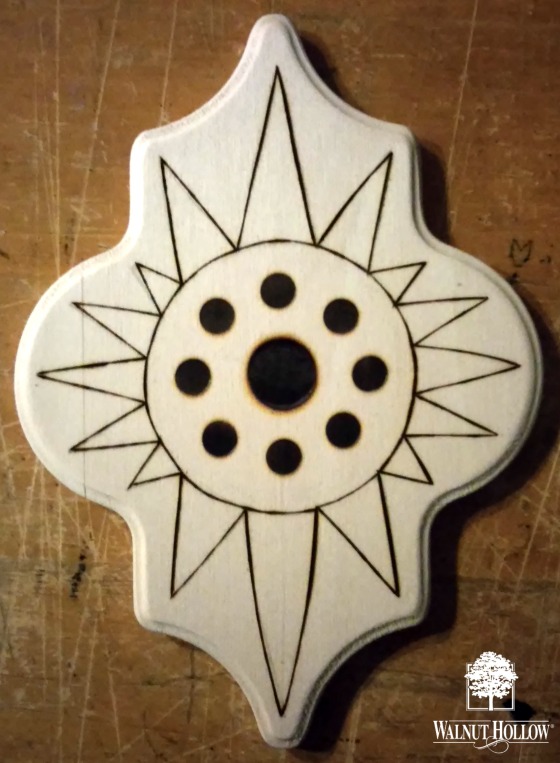
My favorite gifts to give are always handmade, but especially ornaments. I used vintage 1950s glass ornaments as inspiration for my wood ornaments. Walnut Hollow has several thin plaques that are great for lightweight oversized ornaments. I used several Marrakesh Thin Plaques and a Circle Thin Plaque for my ornaments. Check out Walnut Hollow’s other wood products for more ornament or other holiday project ideas. The shapes I used also come in bigger sizes, if you want a more dramatic look. This project involves intermediate woodburning skills. Designs can be as simple to complicated as you are comfortable woodburning. While I chose vintage 1950s glass ornaments for my inspiration, you can customize this project to your own design style. I enjoy a colorful retro kitschy aesthetic for Christmas and holiday decor.

SUPPLIES:
- Marrakesh Thin Plaque
- Basswood Thin Circle Plaque 6″
- Creative Versa-Tool
- Universal Point – It’s the big angle point in the Creative Versa-Tool kit
- Transfer Point – It’s the big circle in the Creative Versa-Tool kit
- Hot Stamps Numbers and Symbols Set – The symbols are very handy for creating easy woodburned designs. I used the small circle
- Pencil
- Big pink eraser
- Ruler
- Watercolor paint
- Gold acrylic paint
- Silver acrylic paint
- Small paint brushes
- Paper plate
- Paper towels
- Sawtooth hangers
- Small nails
- Hammer
- Drill (optional)
- Ribbon or twine (optional)
INSTRUCTIONS
1)Using the ruler and pencil, find the center of each wood plaque. Draw your design symmetrically around the center. For the circle plaque ornament, I chose symmetry in quarters, meaning that all four quarters matched. For the marrakesh plaque ornaments, I chose half symmetry, meaning the top and bottom matched, and the sides matched, but all four sides weren’t matching. Draw circles where you want to use the circle Transfer Point and small circle point. Draw any other small designs that match with the other symbol points.

2) Screw the Universal Point onto the Creative Versa-Tool. Set the tool on the stand. Turn the dial all the way up to the end of red. The hottest setting provides the smoothest burn. It will take a few minutes to fully heat up. I let it heat up while I was drawing on the ornaments.
3) Follow the drawn lines with the Universal Point. I like to use it at the tip, slightly angled down and pull it along the lines. Remember, you can always make lines wider and darker by going back over them, but you can’t make them smaller. Commit to your woodburning! It doesn’t have to be perfect. Woodburn all of the lines on your ornaments before moving to the next step. However, you can always add more line details later if desired.

4) Turn the Creative Versa-Tool off. Let it cool down completely. This will take about 10-15 minutes. When cool, unscrew the Universal Point, and place it back into the case. Screw on the Transfer Point. Place the tool back on the stand. Turn the tool back up to full red. Let the tool heat up fully.
5) Hold the Transfer Point above where you want your large circles. Press down for a few seconds, as it burns quickly. Lift the Transfer Point up to see if the circle is fully burned. Re-burn any section that isn’t a full circle. Repeat this step for all of your large circles in your drawn design.

6) Turn the Creative Versa-Tool off. Let it cool down completely. This will take about 10-15 minutes. When cool, unscrew the Transfer Point, and place it back into the case. Screw on the small circle point from the Hot Stamps Numbers and Symbols set. Place the tool back on the stand. Turn the tool back up to full red. Let the tool heat up fully.
7) Hold the small circle point above where you want your small circles. Press down for a few seconds, as it burns quickly. Lift the small circle point up to see if the circle is fully burned. Re-burn any section that isn’t a full circle. Repeat this step for all of your small circles in your drawn design.

8) Repeat steps 6 & 7 for any of the other symbols included in the drawn design. When you have completed woodburning your design, turn the Creative Versa-Tool off. Let it fully cool down. Remove the tip. Store the tips, tool, and stand in the case.
9) Erase all the pencil lines. I find a big pink eraser helps remove the pencil lines well.
10) Using watercolor paint and small paint brushes, color your wood design. Carefully paint between the woodburned designs, so they aren’t muddled by paint. Use the cup of water and paper towels to clean the brushes in between colors.

11) Pour a little silver and gold acrylic paint on the paper plate. Add metallic details with the paint and small paint brushes. For the small dots, I used a paint brush end dipped into the metallic paint. For even dots, dip the end in metallic paint, each time you want to paint a dot. Let the paints fully dry before moving on to the next step.

12) With silver and gold acrylic paint and small paint brushes, paint around the ornament’s decorative edges. Paint the back of the ornament too.

13) With a hammer, add a sawtooth hanger to the back of each ornament with two small nails. I hung my ornaments outside on my covered porch, because they were too big for my already over decorated tree.
14) To hang your ornaments traditionally, drill small holes through the top of each wood ornament. Cut a 6″ piece of ribbon or twine. Thread it through the hole. Tie the ends together in an overhead knot. Repeat the loop attachment for each ornament.
15) To hang them outside, decide the hanging arrangement. Hammer small flat head nails into the wall. Hang the ornament on the nail with the sawtooth hanger on the ornament back.

For the circle, I placed it inside a paper flower wreath my daughter made for our porch. I added ribbon to the back through the sawtooth hanger, and attached it to the wreath.

While I love a bright color pallet for decorations, these ornaments would look great in any color palette…traditional red and green, monochrome, browns and coppers, etc. For added dimension, add gems with industrial glue. Add sparkle with glitter or other metallic paints. String the ornaments together with heavy twine and hang them has a dramatic garland. The applications are limited only by your imagination. Whatever you create, have fun with it and a happy holiday!
 Abby has been an artist and crafter since she was a young child. She has been sewing and creating for 30 years. She has a degree in Fashion Design. She started her blog, Crafty Lady Abby in 2009, as a way of documenting her creations and motivating herself. She creates tutorials to share her creative knowledge and empower others to be creative.
